How to give your architectural photographs a more professional look by straightening your images?
Perspective correction
To come closer to the perspective views of architects, or to the perception of reality that we have thanks to our brain, it is customary in professional architectural photography to fix the horizontal plane and ensure that all the verticals of the images are parallel.
Unless you have a specialized photo lens, known as a decentering lens, which allows you to directly frame your image while preserving the verticals, you need to be able to anticipate the straightening and/or cropping you’ll have to do on images taken with a normal lens.
Vertical straightening for architectural images
Since the advent of digital photography, it’s been easy to straighten your images using applications, but there are a few prerequisites.
The tripod is the essential tool for mastering the main axes that make architectural photography more professional: horizontality, verticality and depth (on which perpendicularity depends).
A tripod is essential for interior architecture photography, where exposures are often longer, or for multi-exposure photography such as HDR, but it’s also advisable for outdoor photography, where hand-held shooting can be difficult to control on several axes.
Horizontality
Unless you have a deliberately artistic approach, you should take care to position your camera as horizontally as possible.
To do this, always activate (this also applies to smartphones) the virtual horizontal level over-display in your viewfinder/monitor or, failing that, use the level bubbles found on some tripods.
Then simply compose your image and rotate your camera slightly so that the horizontal marker is aligned with the center of the screen.

Verticality
Once you’ve positioned your camera horizontally, you’ll also get a first perpendicular vertical at its center.
To achieve perfect verticality throughout your photograph, you have two options:
1. Either compose your photo by rotating your camera on the horizontal axis, so that all verticals are parallel.
See “off-center lens simulation” for prerequisites.
2. Or take your photo “normally” and then straighten the verticals with a photo editing application that offers a dedicated tool.
This choice implies taking into account a zone outside the frame on each side of your image, see the concept of “cropping”.
Perpendicularity
Our world is three-dimensional, and your camera is no exception!
In architectural photography, we often alternate between shots taken from the front, as in an architect’s elevation plan, or with sharp angles to accentuate perspective.
When you want to photograph a building perfectly from the front, or an interior room perpendicular to a wall, you need to remember to rotate your camera precisely on the vertical axis.
When you want to photograph a building perfectly from the front, or an interior room perpendicular to a wall, you need to remember to rotate your camera precisely on the vertical axis.
In freehand photography, it takes a great deal of concentration to master perpendicularity, as well as horizontality and verticality, and this is very often to the detriment of the attention that should be focused on the composition of the image.
6 tips for mastering vertical straightening in architectural photography

Straightening verticals in outdoor architectural photography, whether done at the time of shooting or afterwards, can involve quite substantial cropping of images.
1. Simulate a decentering lens
Making the verticals parallel is possible at the moment of shooting, but depends on several limiting factors: the size of the buildings photographed, the focal length of your lens, the distance you have to stand back and the height at which you are standing.
When you align your camera horizontally and vertically, the center point of your image is at your shooting height.
This means that if you want to photograph very tall buildings entirely from the ground, respecting these two axes, you may have to remove up to 40% of the lower part of the image during processing.
That’s why it’s best to use a high-resolution camera for this type of photography.
In this example, I’ve mounted the image on a low wall to raise the focal point of the image a little and reduce the importance of the floor area slightly.
Here, the floor pattern is very graphic and could be kept for the most part, but in most cases where the building is going to be tightly cropped, the lower third of the image of little interest will have to be removed.
Pro tips
Outdoors
1. Positioning yourself high up will optimize this photography technique.
2. Be careful to focus on the main building being photographed.
Indoors
By placing your camera halfway up a ceiling, you’ll obtain a directly usable image, with an equivalent proportion of ceiling and floor, which won’t require mandatory cropping.
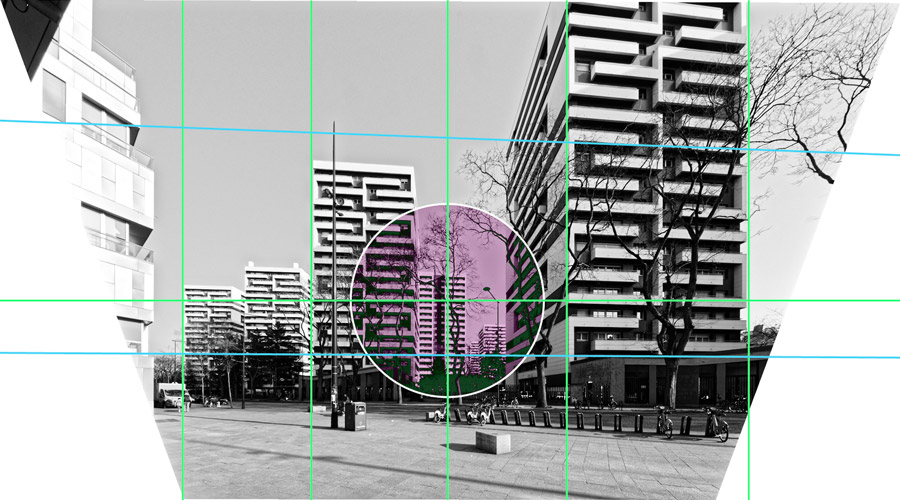
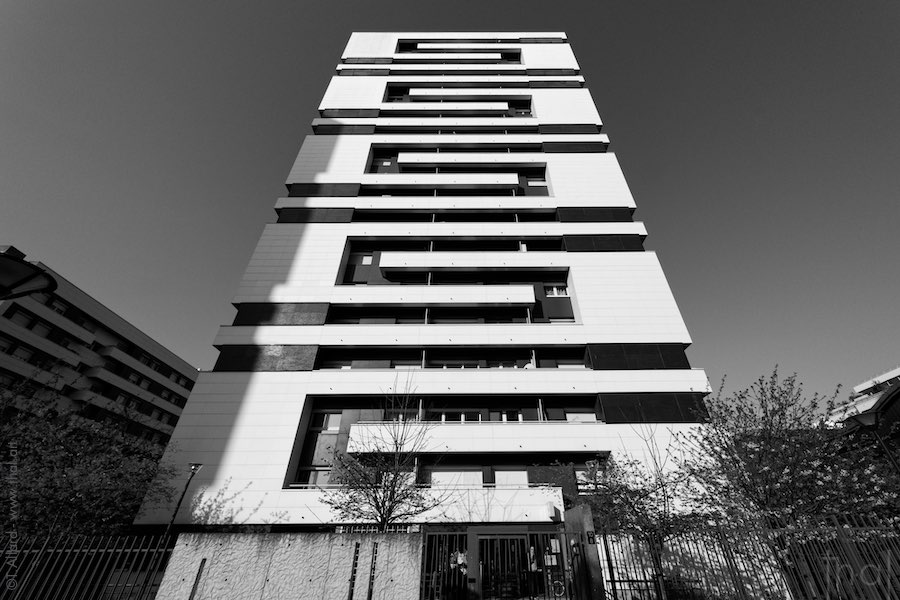
2. Plan post-shot cropping
When shooting architecture, if you can’t apply the decentering technique explained above, you need to know how to anticipate the straightening of the verticals that you’ll carry out later with your photo retouching application.
This means that you should always allow for a larger area on each side of the image than your ideal framing, because once straightened, the image will have a trapezoidal shape, making cropping compulsory.
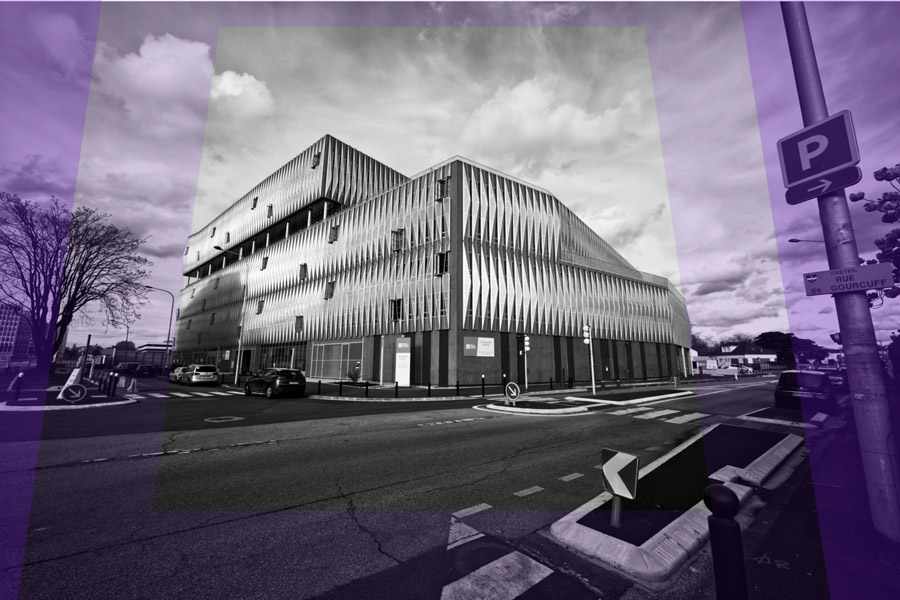
Example of a shot with an enlarged framing area in preparation for straightening the image.
The pole is retained, since once straightened, it will “free up” part of the sky on the right-hand side of the image.
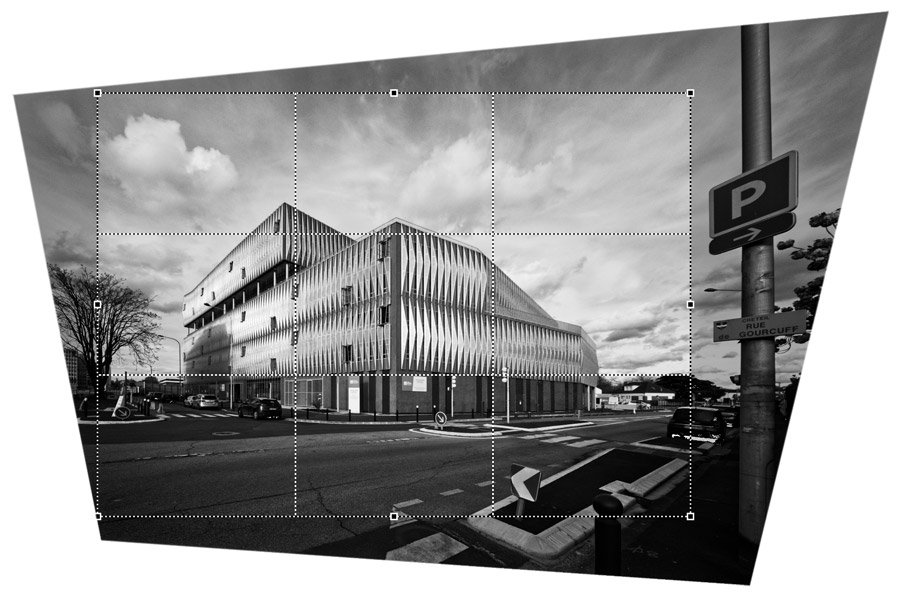
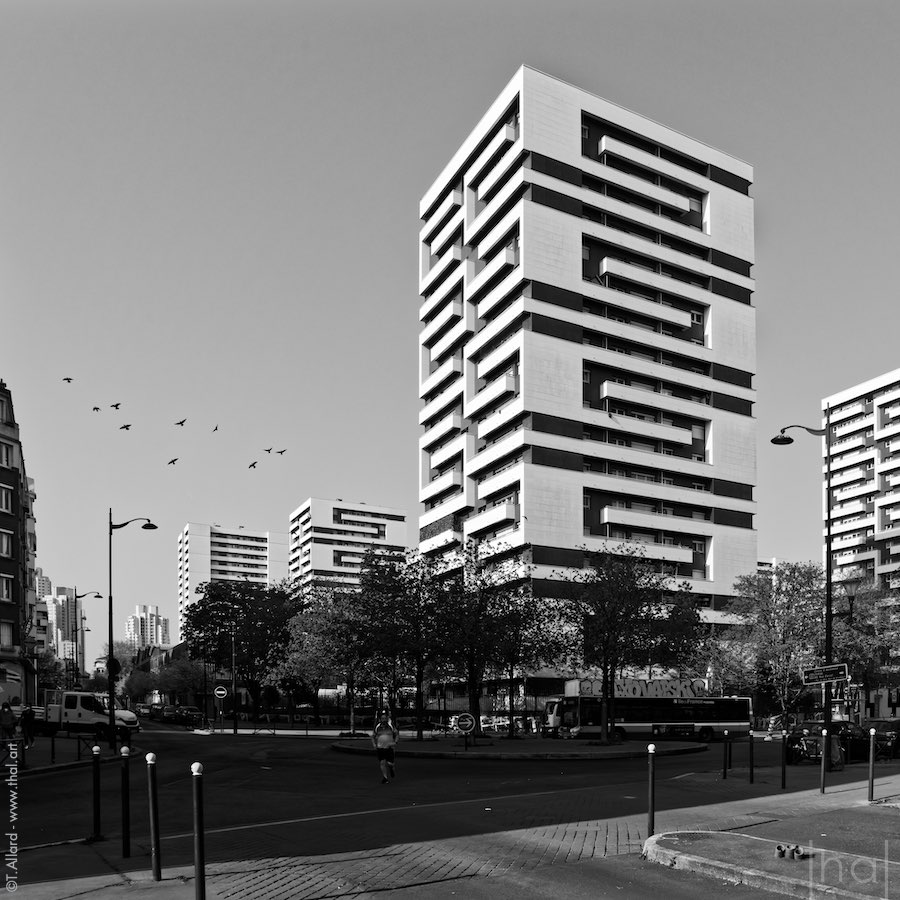
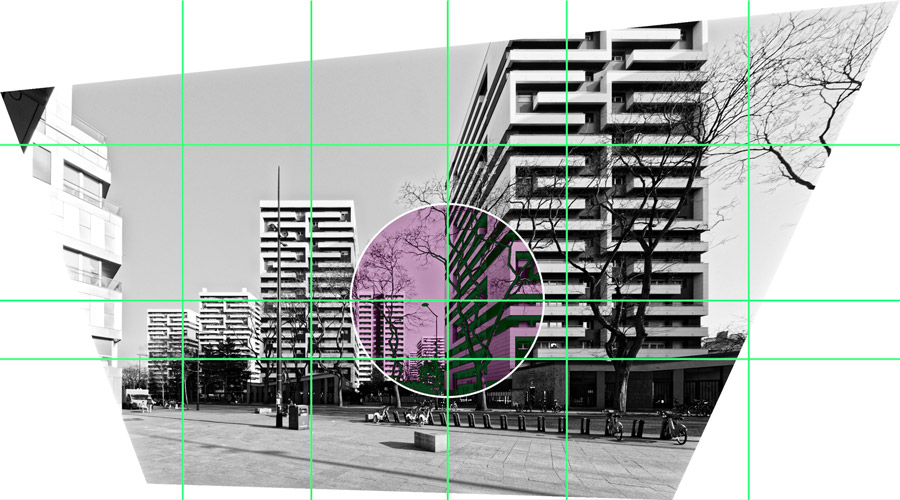
Example of cropping a photograph of L’îlot Eiffel in Créteil, straightened on the horizontal and vertical axes.
Pro tips: the “decadrage” technique
I coined this term (which doesn’t exist in photography) in order to propose, during my individual architectural photography training courses, a solution for learning how to plan for an out-of-frame area at the moment of shooting, without altering the compositional idea.
If you have a zoom lens, or failing that, a fixed focal length and legs to move around, here’s how to apply the “decadrage” technique:
- First, you create your ideal composition and framing,
- Then, either zoom out a little, or step back to create your future cropping area in the image.
- When you straighten the image, you’ll find it easier to restore the composition close to your original intention.
3. Limit vertical angle of view
Straightening verticals, even with software, has its limits.
Beyond a 20° angle of the verticals on the sides of your image, it will be more complicated to obtain a good result after straightening, as the possible cropping area will shrink enormously.

Here’s an example of a photograph of a building set at an angle of 22.5°, which is virtually impossible to crop.
If you don’t have a wide-angle lens smaller than 24 mm, you’re going to come across a lot of situations where you’ll have to forget about straightening some of your architectural images.
Pro tips
To anticipate strong straightening, reserve at least half the image (1/4 on each side) for later cropping.
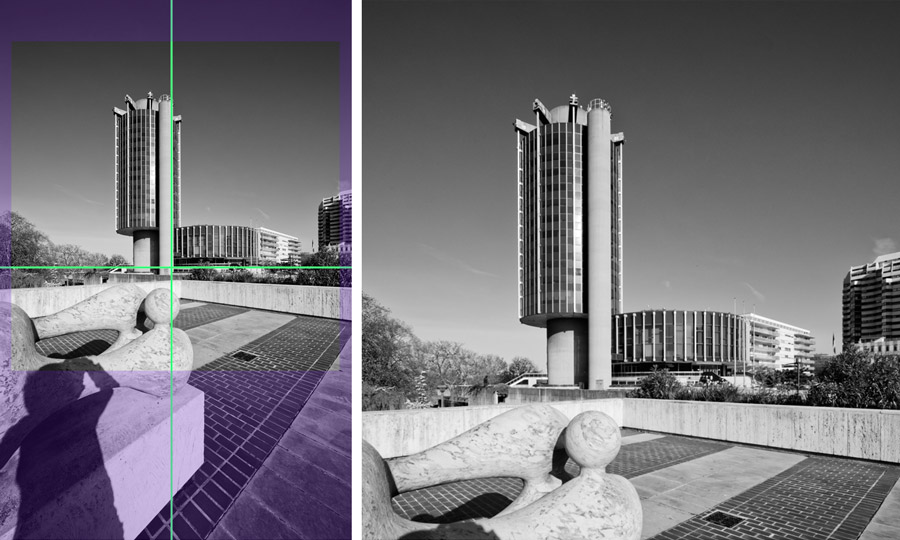
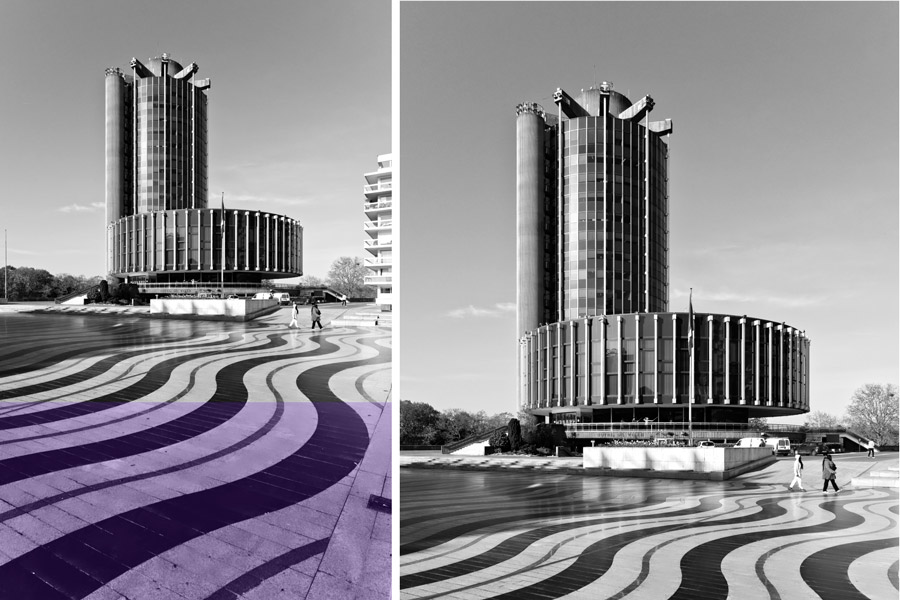
4. Centering spherical buildings
Buildings with a spherical profile, such as certain towers, are often more distorting than parallelepiped buildings, when photographed with a wide-angle lens and close to the edges of an image.
As straightening them further accentuates the optical distortion caused by the lens, it is preferable to place them in the central third of the image, even if this means cropping them considerably.
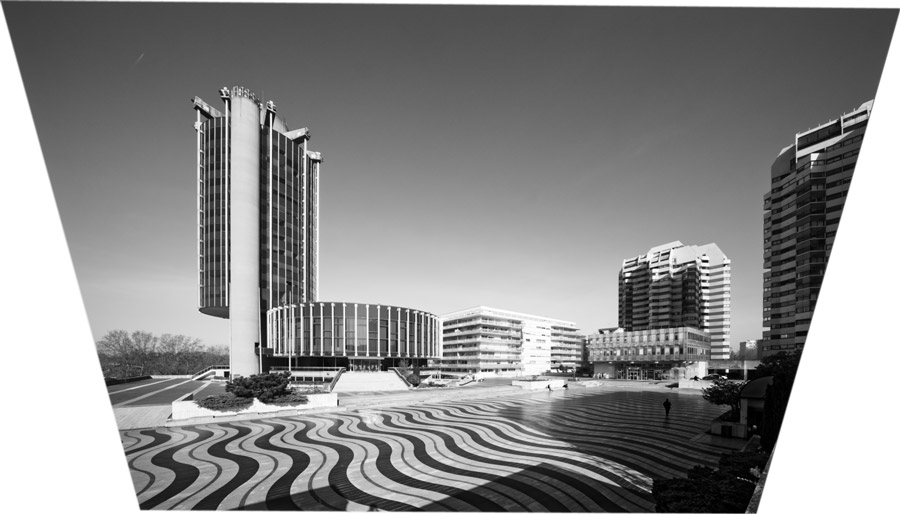
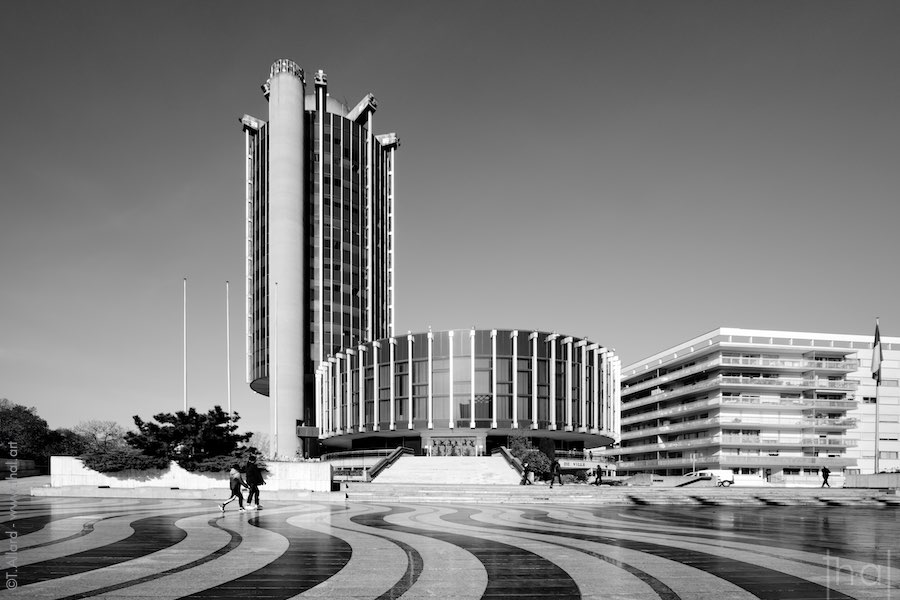
Example of the Créteil town hall, distorted by a composition that places its cylindrical tower too close to one side of the image.
Pro tips
For an off-center composition of spherical buildings, the “decadrage” technique mentioned above needs to be adapted, since it’s no longer simply a question of enlarging the image field from the depth axis alone:
1. Compose and frame your image.
2. Refocus the lens on the area containing the spherical buildings.
3. Zoom out or step back:
1. Ensure that the spherical buildings do not extend beyond the central third of the image.
2. Make sure you find all the elements contained in your initial framing.
4. Straighten the image with your photo retouching application and then crop it according to your initial composition idea.
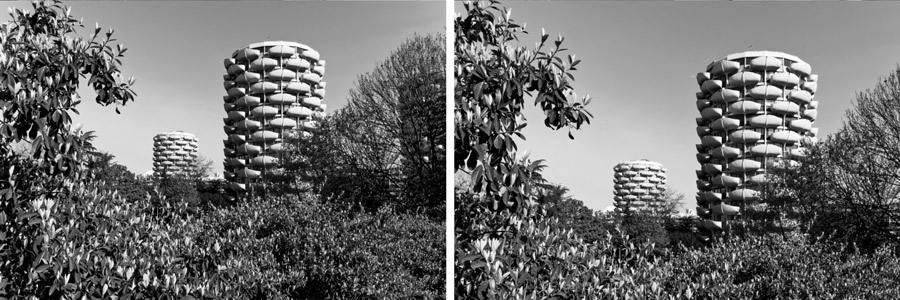
Example of the centering of round towers (Les Choux by Gérard Grandval in Créteil), in anticipation of a slight straightening with off-center cropping (right) with no perceptible visual distortion.

Example of a distortion of the round towers in Créteil, placed too close to the sides of the image and impossible to correct during straightening (right).
5. Move away to eliminate distortion

A long distance and the use of a long focal length make it easy to eliminate distortion, and means that images do not need to be straightened.
But the consequence is also to reduce the effect of perspective and limit the angles of view.
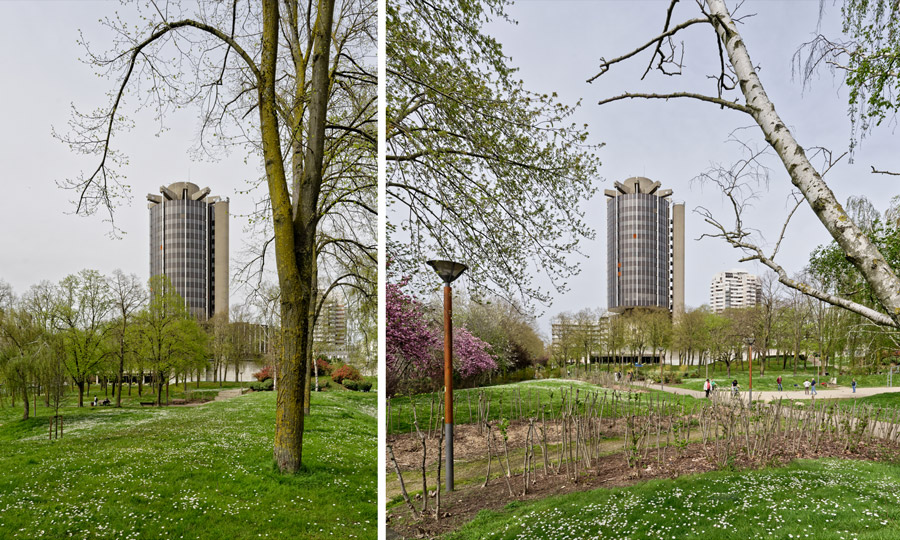
Exemples de composition centrée de l’Hotel de ville de Créteil avec un fort éloignement supprimant toute déformation.
6. Controlling depth of field
In outdoor daytime architectural photography, as long as you have more than ten meters of setback, there is little risk of depth-of-field problems if you use wide-angle lenses up to 24 mm, even with apertures smaller than 8.
In other conditions, with longer focal lengths, in cases of low light, little recoil, or when using cameras with small APS-C sensors, it is advisable to remain more vigilant, because when straightening the verticals of a building, we inevitably expect its top to be as sharp as its base!
Pro tips
- Choose apertures greater than 8.
- Focus at least a third of the way up the building.
- Always carry a small application like Simple DOF (on Iphone), which makes it easy to determine depth of field according to lens aperture and distance in focus.
You might also be interested in other architectural photography tutorials such as: Under-exposing an architectural shot against the light or using an ultra-wide angle for real estate photography.
Tutorial by architectural photographer Thierry Allard
©Le blog des studios: any use of the content or images in this article is subject to authorization, including for Artificial Intelligence robots.
Why do the greatest professionals in architectural photography respect the three axes when shooting?
Because rotating or straightening a digital image in post-production with software can add artifacts and affect the sharpness of contours.
The digital sensors in our cameras produce images composed of square pixels.
An initial software correction to correct image distortion caused by the lens (optical aberration) can already constitute a slight degradation of the image.
If rotation or other digital adjustments are added to a photograph, it must then be re-interpolated, with the square pixels virtually distorted and then recomposed.
This can alter the sharpness of straight lines, which are quite common in architecture!
Depending on the angle of tilt to be corrected, the artifacts created by software correction will be more or less significant.
Unfortunately, an image tilted just a few degrees is likely to lose more sharpness when straightened than an image tilted more sharply!